
Easy Beginner’s Guide to a Long Term Food Storage Supply
This post may contain affiliate links. As an Amazon Associate I earn from qualifying purchases at no extra cost to you. Click HERE to read my policies & disclaimers if you're interested. I will only link products I use and personally recommend. Thank you for your support, friends!
Diving into long term food storage can be a bit overwhelming. I am sharing what has worked for me over the years and use what I write as a tool to get started, be inspired, and work through the overwhelm of jumping into gathering a long-term food supply. There are tons of different methods to store food and everyone will have an opinion; at the end of the day, what works for you is best! And that might not be my way, but this will help you get started! I sincerely hope this gives you guidance and confidence to begin a long term storage safety net of food to have on hand to give you peace of mind.

Whether it’s job loss, illness, low funds, or natural disasters, I believe every family should have a minimum of 3 months to 2 years worth of food stocked in their household for basic preparedness. This isn’t apocalypse prep; this is just simply being prepared for life circumstances. If the good Lord is calling me home, I’m going home. We don’t live in fear here!
We just like stocking up on food we eat in bulk at a good price and locking in that price for a really long time. We also like the security and safety net of having a little food stored back that can feed us (or others) if something would happen. Having that peace of mind is invaluable and I encourage you to get started today. Little steps toward building a long term food storage is so worth it and you’ll build your stock more quickly than you might think.
Visit my Amazon Storefront long term storage section for supplies and tools I use!
Equipment You May Use:
What is Long Term Storage?
I consider long term food storage the storage of any food that can keep up to 30 years. This is either in food grade buckets, vacuum sealed in jars, in jars with oxygen absorbers, or in mylar bags. I do not consider home canned food very long term because to reap the highest nutritional benefits, they should really be eaten within 2 years or they do start to degrade. I’m not throwing them out, but for the sake of this guide, we will focus more on the dry food aspect and how long things will store and what we should store.
What are the Best Things to Store?
For me, if I had to choose three things it would be rice, beans, and wheat berries. All can be made into delicious meals that are nutritious and will fill bellies rather easily. When stored in mylar bags with oxygen absorbers, rice and beans will keep up to 20+ years. Wheat berries can be stored indefinitely and don’t need mylar if you choose not to use it.
I always tell folks, pick the top 3 things you like to eat that are dried goods and start there. If you like spaghetti, stock upon premade pasta or ingredients to make it! If you don’t like rice, don’t stock up on it. You’re not going to want to eat it, so don’t waste your money or time. When shopping for your food, grab an extra item or two each time funds allow and store the extra!
Organize by 3 “layers” of storage:
- Primary Storage (First layer)
- Secondary Storage (Second layer)
- Long Term Storage (Third layer)
Primary Storage – First Layer
Think of primary storage as the food you use every day to cook with. The food in your kitchen pantry. The dry goods you would store in canisters on your counter and use for baking. Are you with me? I have all my canisters of sugar, flour/wheat berries, oats, and pastas full before I start adding to the next layer. I can also pull from the Secondary layer to refill these. This storage is usually no more than 1-3 months worth of food.
Examples of my primary storage are glass jars filled with dry pasta I’m actively using out of and my wheat berry & sugar canisters in my kitchen.
Secondary Storage – Second Layer
Secondary storage is where I can pull from to refill primary storage or pull from to can. The only dry goods I keep in secondary storage are beans and pasta. Beans aren’t an ingredient I frequently use from dried but I do can them, so I don’t normally put the entirety of a bulk purchase of dry pinto or black beans into a bucket or mylar so I have some to can and use without having to break into a mylar bag.
Pasta is the same. It keeps really nicely just on the shelf so I do keep a secondary storage of this that is easy to pop open and refill my primary. Both of these ingredients are stored in half gallon mason jars that I vacuum seal. You could also store in the containers or bags they come in, but I prefer a better layer of protection from rodents & moisture. This layer is also entirely unnecessary in some settings because you could just put purchases in your long term storage layer and shop to refill your primary!
Long Term Storage – Third Layer
Long term storage is what this guide is focusing on. This is going to be your food grade buckets and mylar bags with oxygen absorbers that extend the shelf life of your food for 10, 20, 30+ years. You can figure out a system that works for you with rotating out your long term storage.
For me, I rotate them out as I need to replenish my secondary or primary storage. If I have to bust into a 5 gallon mylar bag, I will cut it open just below the seal, take out what I need, add a new oxygen absorber, and heat seal again with my flat iron. For me, mylar is reusable and resealable until you have just a nub left and not enough to seal anymore! I mainly use my long term storage for bulk bought goods at a good price.
When you buy large amounts, things are usually quite a bit cheaper, and if you know how to store them properly, you can save a lot of money this way by locking in a good price for years to come. When I buy a 10lb bag of dry beans, as an example, I will fill my secondary storage first, if needed, and then will dump the rest into a food grade bucket with a gamma lid and an oxygen absorber. It will take me quite a bit of time to even need to break into that bucket again. Likely about 1 year or so because of my secondary storage.
If I find a good deal/sale on something that we use quite a bit, I will stock up and put it into long term storage as long as my first and second layers are full and stocked. I don’t clean the shelves, but I recently found some super fancy spaghetti that retails for almost $3 a box for $.50 each and I grabbed them.
They were 3 months expired, but expiration dates mean absolutely nothing to me. I’ll let you guys look into that for yourselves. But we Americans are so stinkin’ obsessed with those silly expiration dates. It’s govt required and they even put them on sugar and salt. I can’t even. If you’re tossing sugar because it’s expired, maybe do some research first.
I digress. I didn’t need spaghetti badly as I had just refilled my primary storage and had a few pounds in my secondary plus I have the ability to make it homemade. I chose to purchase and put that spaghetti straight into mylar bags with oxygen absorbers and it will keep for years now. It would store fine on the shelf, but again, mylar protects it from moisture and allows you to remove the oxygen quite easily and efficiently. If my storage room were to flood and my first layer of protection for these mylar bags failed (we’re talking plastic containers), mylar is waterproof and will protect that food.
Long-Term Food Storage Plan
A good amount of planning is involved with this along with inventory and knowing what you have. I always recommend folks start working on their long term storage first and building from there to find what works for them. When you buy a bag of rice to replenish your primary storage, buy a second bag to place into long term storage.
It doesn’t have to be thousands of dollars up front at once. You can slowly build on this one week at a time and it grows faster than you’d think. Every time you’re at the store getting groceries, grab 2 of something that you’re buying. It could be canned mandarin oranges or a bag of all purpose flour. As long as you know how to store them, you’ve got this!
A good rule of thumb is to keep track of all dry and canned goods you go through for 1 month. After that month, evaluate what you used the most of. Plan to pick up extras of those items at each grocery haul as your budget allows. Even 1 extra can of beans or a bag of rice each trip is better than nothing.
When bringing home food and starting your little stock pile, it’s good to have a set place to store them so you can stay organized and know what you have. A cool dark place is preferable. I store my mylar bags inside totes to provide double protection from the house mouse that inevitably finds me. Use common sense and do what works for you here. Closets, under beds, garages, and more all work for good storage places if you’re creative and smart. You definitely don’t need a doom shelter :D

Storing Long Term with Mylar Bags
Mylar bags are my favorite choice for long term storage of bulk foods, because they offer an extra layer of protection from moisture and the elements, and they’re easy to seal and toss in an oxygen absorber to create an environment that will protect nutritional value of dry goods and you can choose the size you need to make nice individual packages to open up and refill your other storage layers without having to open a ton at a time. They come in lots of different sizes and are actually reusable and washable, which is a nice cost savings. A well-stocked pantry is always a great thing.
When using mylar, you’ll come across oxygen absorbers vs. desiccant packs. What should you use?!
Oxygen absorbers are little packets containing iron powder. They work by utilizing the chemical reaction between iron and oxygen. Any foods that can be spoiled by oxidation are appropriate to store with an oxygen absorber. By decreasing the amount of oxygen in your food when storing, you are preventing the growth of bacteria, mold, and bugs.
The size and amount of oxygen absorbers you use depends on the density of food you are storing and the size of the mylar bag you are using. I made my own chart with my research and personal experience based on dense foods and less dense foods. Dense foods for me are ones that settle together tightly within the bag and don’t really leave nooks and crannies for air; examples being flour, wheat berries, oats, and rice. Less-dense foods are ones that don’t settle together tightly and leave bigger areas for air to stay, such as pasta and beans. Anything chunkier than a wheat berry or grain of rice, I consider less dense foods.
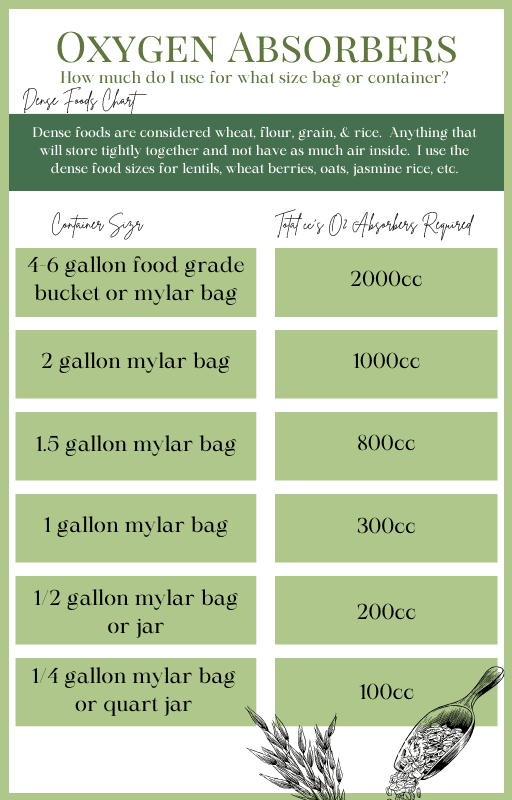

Desiccants absorb the moisture around them. They are usually made with silica gel or clay. Anything that is prone to spoilage should be stored with desiccants. These are commonly used for storing electronics, leather goods, pharmaceuticals and such but are often good for storing meat jerkeys & baked goods to maintain quality and texture.
The main decision you need to make is what kind of food you want to store and what manner of spoilage is it more prone to? It also depends how you store them. Oxygen absorbers are happy in air tight storage containers (mylar, air tight buckets) while a desiccant will work in anything as long as it is touching the product.
If I had to choose between the two with long term storage, go with oxygen absorbers and ditch the desiccants, although there’s a lot of opinions surrounding this so do some research. I have always stored my dehydrated potatoes long term with an oxygen absorber and a desiccant packet but was recently taught that oxygen absorbers are less effective in the presence of no moisture. We’re always learning!
Storing Common Goods Long Periods of Time
Pre-made Pasta
Dump into mylar bags, add the appropriate amount of oxygen absorbers according to bag size, seal, and write date, contents, and cooking instructions on bag. I store smaller packs of mylar bags within a larger tote or metal trash can for added layers of protection.
Dry Beans
I buy these in large quantities from bulk food stores and dump them straight into a food grade bucket with a gamma lid. I toss in enough oxygen absorbers for a 5 gallon bucket and screw the lid tight. You can choose to put them in mylar for an extra layer of moisture protection.
When you’re ready to pull your dry beans out of long term storage, you can flip them to primary by canning them! Learn how here.
Sugar & Salt
I buy my unrefined sugar and salt in large 25-50lb bags. I simply dump these bags into a food grade bucket with a gamma lid. I do not use oxygen absorbers with these as they will store indefinitely and are not sensitive to oxidation. There is also a risk of botulism in sugar storage in the absence of oxygen so keep that in mind. As long as both are stored away from moisture and with a barrier to smells, they will last until the Lord returns.
Wheat Berries
After freezing twice for 24 hours each and allowing to come to room temperature between and prior to storing, I then dump my wheat berries directly into a food grade bucket with a gamma lid and add bay leaves. If I am planning on not using the wheat berries for longer than a year, I will throw in the appropriate amount of oxygen absorbers although they’re not necessary since wheat berries store indefinitely really.
Dehydrated Fruits & Vegetables
When dehydrating vegetables, make sure they are completely dry before storing. I vacuum seal some in mason jars if I plan on using them within 6 months or will put them in a mylar bag with the appropriate amount of oxygen absorbers if I am planning to store them longer. I keep these mylar bags organized within a large tote to deter rodents. This storage works the same with freeze-dried foods, they just have a much longer shelf life.
Herbs & Spices
Most of my herbs and spices are stored in vacuum sealed mason jars. I usually am using them frequently so I don’t bother with mylar and oxygen absorbers. Medicinal herbs that I buy in bulk that I cannot grow myself do get put in mylar bags or mason jars and sealed with oxygen absorbers as they’re usually a bit pricey and this ensures the best shelf life.
Store Bought Processed Flour
After preparing for storage like grains (freezing method), put this into a food grade bucket with a gamma lid since it will likely be accessed frequently. Anything bought that will need to be stored longer than 6 months to a year, put in large mylar bags with oxygen absorbers and bay leaves to extend shelf life and prevent bugs.
Rolled Oats
After freezing twice for 24 hours each and allowing to come to room temperature between and prior to storing, I store in mylar with an appropriate amount of oxygen absorbers. We don’t go through rolled oats that quickly so I need these to keep longer term because a bulk bought bag will last us a minimum of 3-4 years.
Chocolate Chips
Because everyone needs chocolate! I like stocking up on good quality chocolate chips right after or around Christmas when they seem to be cheapest around me. I usually grab about 20-25 lbs worth and pour them in mylar inside a bucket to store long term with oxygen absorbers. As I need them, I can cut open the mylar bag, refill my primary storage container, and reseal the bag! By stocking up this way, I only buy chocolate chips every 5+ years.
Preparing for Storage & Defeating the Bugs!
A very common question with storing dry grains long term is bugs. How do we prevent them? I’m sure most of us have come head to head with rice weevils or pantry moths because, if we’re being honest, our food is grown in fields outside and outside has bugs. And bugs lay eggs. And those eggs can hatch. So HOW do we keep those eggs from hatching and finding a bucket full of bugs!? This pertains exclusively to whole grains, milled flours, rice, oats, all the things like that.
I’ve got 3 easy solutions for you to avoid the forbidden protein, unless you think rice weevils are a delicacy!
1. Freeze your grains for 24 hours 2 separate times, allowing the grains to come completely to room temperature for 24-48 hours between and prior to storing.
2. Store your grains with bay leaves in them. This deters bugs.
3. Store your grains in air tight containers and/or mylar with an appropriate amount of oxygen absorbers for the size bag you are using. No oxygen, no bugs.
By doing all three of these things, I have had zero issues with bugs in my long-term food storage pantry!
Now I’m going to give you a couple of quick run throughs for dry goods storage in my home for the long term (third layer) storage.
How to store pasta long term:
Step 1: I find pasta on mega clearance for $0.40 per 1 pound box. I purchase it.
Step 2: Using gallon mylar bags which hold about 3 pounds of pasta, I pour that pasta into the bags. I am sure to add the same type of pasta to the mylar bags; mixing wouldn’t be helpful when you go to cook it because the cook times vary… duh.
Step 3: After filling the bags with the pasta, I add 400cc worth of oxygen absorber packets. This can be 4-100 cc or 1-400cc or 1-500cc. Too much is better than not enough!
Step 4: I seal the bag with an impulse sealer. You can also use an old flat iron/hair straightener and clamp it to the top to melt the plastic all along the top. I do as close to the edge as I can so when I cut it to open it, I don’t waste a bunch of the bag and I can reuse it.
Step 5: Label the bag with the contents, date, and how long to cook the pasta.
Step 6: I store the mylar bag in my tote designated for pasta. I keep mine in an order of oldest at the front, newest at the back to adhere to a FIFO (first in, first out) organization plan.
How to store wheat berries long term:
Step 1: Freeze the bags of wheat berries for 24 hours two separate times, removing from the freezer for 24+ hours to fully come to room temperature between freezes and then after before storing. This is great to do when the outdoors is your freezer!
Step 2: Using a food grade bucket fitted with a gamma seal lid (I get mine at Menards of all places, wash the buckets and lids, and then bat my eyes at my husband to have him install the lids because they’re a PAIN and not easy to snap on), add the wheat berries. Now, if you didn’t freeze them 2x beforehand like I said in the previous step, use 3000cc of oxygen absorbers and tighten the lid and leave it undisturbed til you need them. Skip the oxygen absorbers if you pre-froze them.
Step 3: Label the bucket and store in a dry location. I have found that gamma lid buckets are one of the best options for storing wheat berries, sugar, and salt because I am frequently accessing them to replenish my primary layer and normally don’t really have a secondary layer of these since they store such a long time without much fanfare needed to do so.


